


 Your new post is loading...

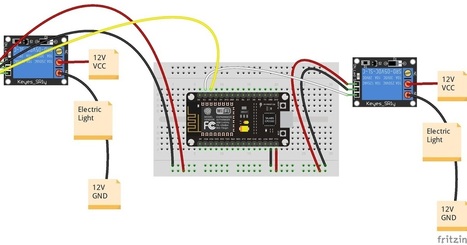

Hi, in this tutorial we will see how to control electrical devices like fan, light, etc., to turn on and off using esp8266 from a web browser. if you are bored with a dedicated device controller like an app or an remote which will be available for only one particular device but using this method all the device which support web browsing will be act as a controller for us.
Make sure all the devices are connected to the same router, this example doesn't include a port forwarding function which will not allow us to control the device from outside the home network.
Components that you need for completing this project are very simple, you need to have an esp8266 wifi module and a relay, make sure you buying a 5v relay which very easy to use with esp chips doesn't require external supply too. we can make use of the Vin pin of the nodemcu or if you are using a generic chip, you need to supply an external 5v to the relay.
Learn more / En savoir plus / Mehr erfahren:
https://www.scoop.it/t/21st-century-learning-and-teaching/?&tag=ARDUINO
https://www.scoop.it/t/21st-century-learning-and-teaching/?&tag=I2C
https://www.scoop.it/t/21st-century-learning-and-teaching/?&tag=LCD
http://blog.mklec.com/how-to-use-iici2c-serial-interface-module-for-1602-lcd-display/
https://www.scoop.it/t/21st-century-learning-and-teaching/?&tag=NodeMCU
https://www.scoop.it/t/21st-century-learning-and-teaching/?&tag=ESP8266+WiFi+Module